In 2020, with continued lockdowns, restrictions on services, and a significant reduction in the number of face-to-face interactions between businesses and their customers, businesses were required to be extremely agile to adapt to ongoing changes within the market. From this, two things became evident.
- Businesses were becoming much more diligent in how they spent their marketing budgets.
- Most businesses that previously hadn’t considered digital marketing as a core function of their business were immediately thrust into the reality that it was no longer a choice, it was absolutely essential.
This blog will hopefully help some of you who are new to the world of PPC marketing, and even help some more experienced users with some of the tips and tricks we’ve picked up on over the years.
- Do you suffer from forgetfulness during your busy days of grinding Google Ads?
If so, leave a note on your Google Ads account whenever you make a significant change such as adding new keywords, incorporating new bidding strategies, or adjusting your campaign targeting.
By adding a note it will allow you to better identify the performance of the account before and after changes have been made. This makes it much easier to work out what is happening to your Google Ads account, and why.
Simply look at the date of the label, and select “Change History” in your second column. We can then identify which change to the account was most likely to cause the change in performance.
- Want to see the exact steps users take before successfully converting on your site?
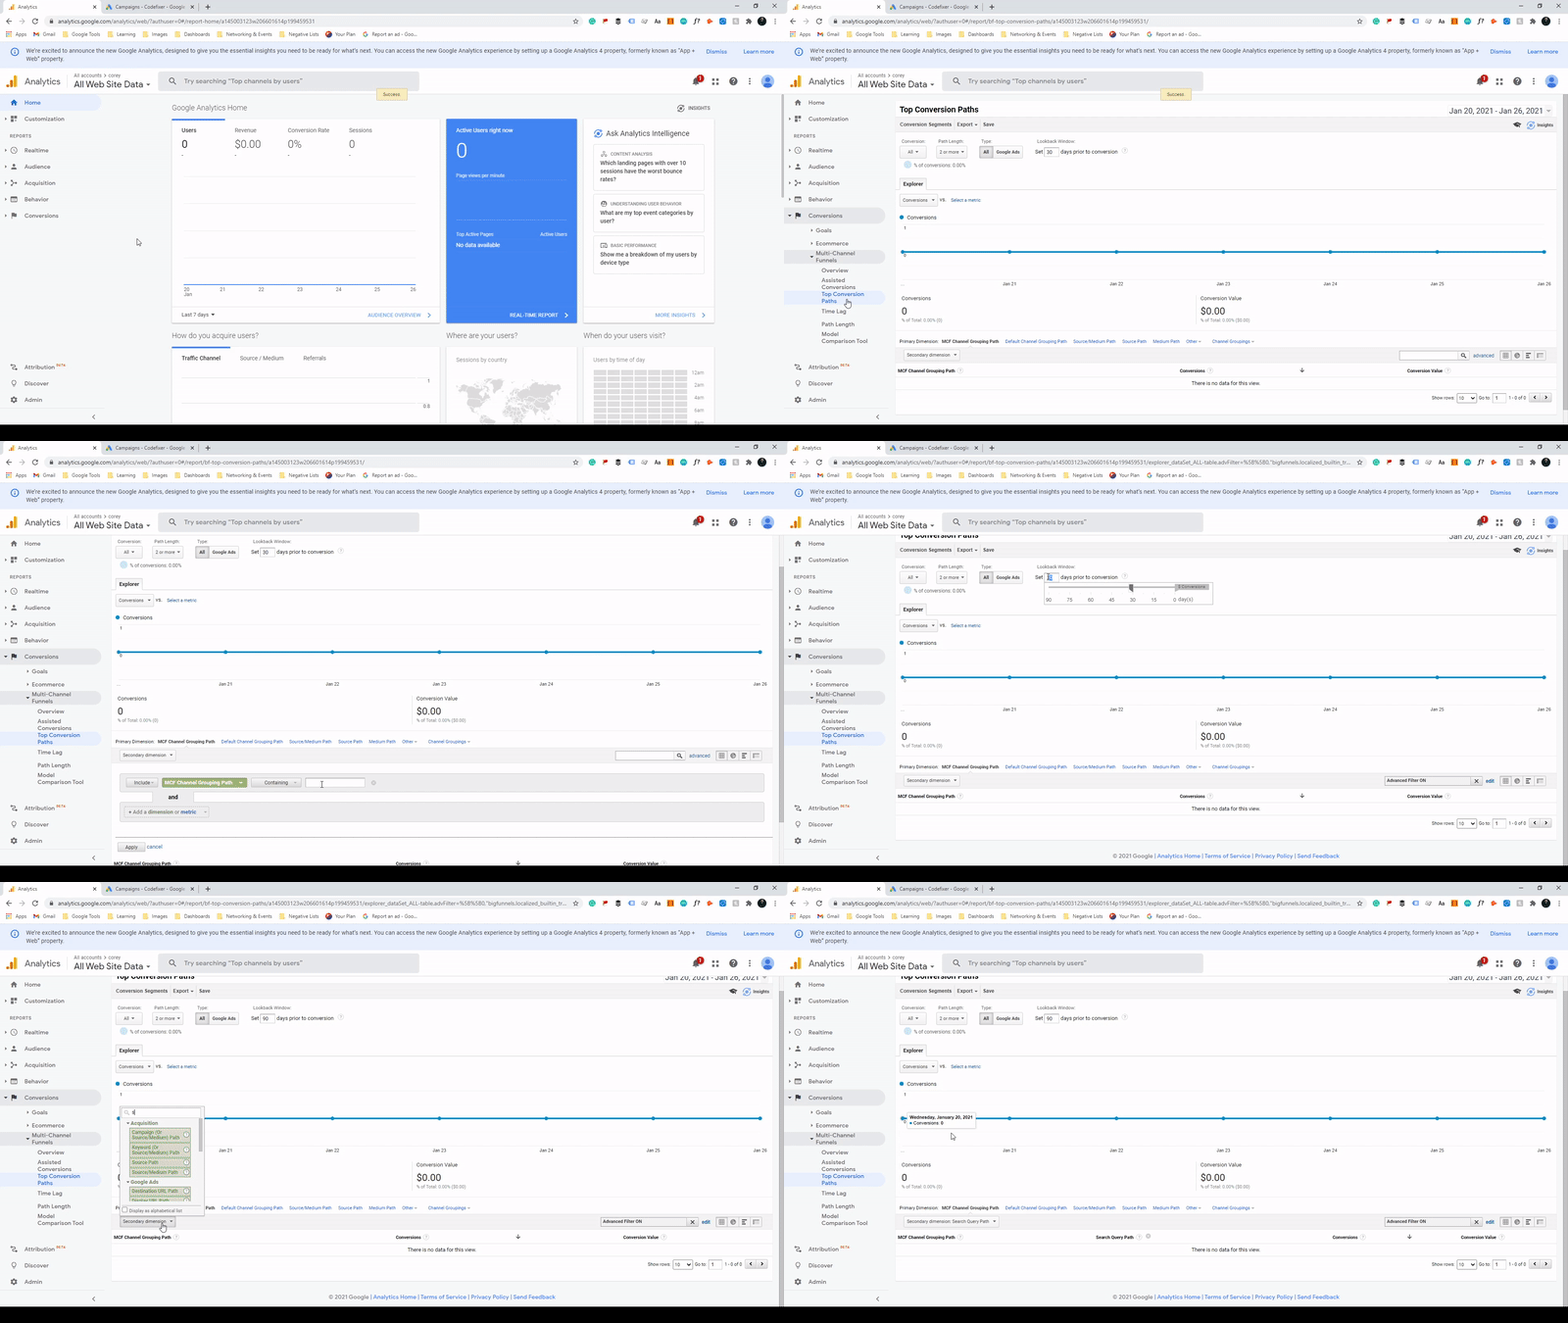
We can use the “Top Conversion Paths” report on Google Analytics to analyse the user behaviour flow.
To find this, click on “Conversions” on Google Analytics in your left side-bar, then “Multi-Channel Funnels”, and select “Top Conversion Paths”. Use the advanced settings to show only paths from users who have visited from the MCF Channel Grouping Path including “Paid”.
Once this is done, we can choose to show a secondary dimension for “Search Query Path”. Ensure only valuable conversions are shown on this report and set the lookback window to 90 days to see the maximum amount of data.
We can now look at the different visits a user makes before successfully converting including viewing the search terms they used to be matched with your ads on Google.
- Do you own one of those Google Ads accounts with tons of disorganised negative keywords?
Here’s a tip – Don’t add negative keywords to the Campaign or Ad Group level unless necessary.
Instead, create Negative Keyword Lists (found in the Account Library) and apply these at the campaign level where applicable. Keep these lists closely themed, such as having a negative keyword list for; competitors, cheap/DIY type searches, and to prevent ads appearing for users searching for irrelevant searches.
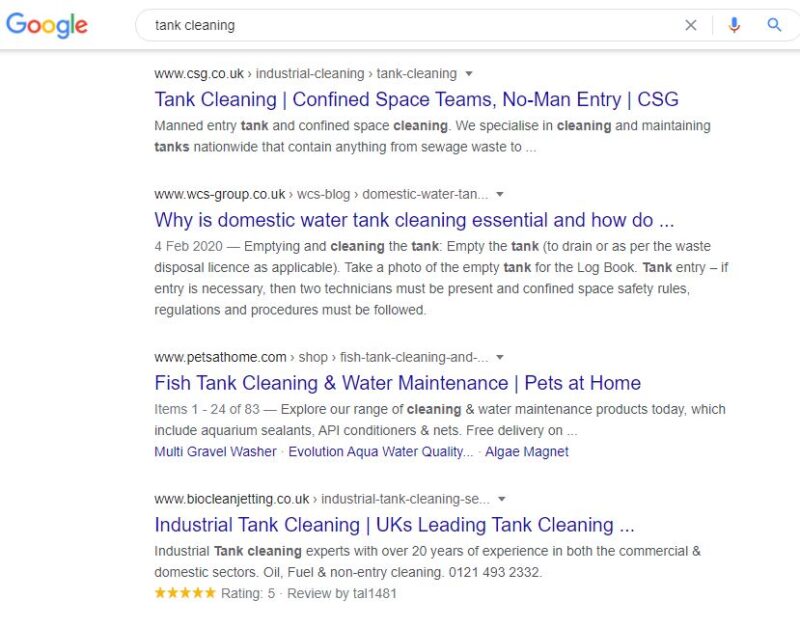
A business may offer Industrial Tank Cleaning as a service, and want to bid on the keyword “Tank Cleaning”.
The problem is, there are 3,600 searches for “Fish Tank Cleaning” each month, and only 390 searches for “Tank Cleaning”, as such, without having the negative keyword, “Fish”, you would run the risk of wasting your budget each day without any users having the chance to find you for the services you offer!
(Yes, I learned this from experience!)
- Noticing users from strange locations clicking on your ads?
Presuming your location targeting is correct, this is likely due to one pesky hidden campaign setting.
When you create a new campaign the default location targeting setting is set to target users “In, regularly in, or show interest in your targeted locations”.
The problem with this is, I don’t care if someone in another location has spent a few hours binging YouTube documentaries on the history of Vikings in Ireland. They’re very unlikely to avail of the services of an emergency plumber in Belfast if they’re currently located in Timbuktu.
To fix this, simply change the setting to “People in, or regularly in your target locations”.
This can be found by selecting your campaign, clicking on settings, expand your location settings, and click on “Location Options”. Once here, you can edit your setting and click save. You should now no longer receive clicks on this campaign from users outside your target areas.
- Ever wonder why your display campaign targeting a 30-day remarketing audience of 1,000 users is gaining tens of thousands of impressions per month?
This is most likely down to another sneaky default setting, this time found in the targeting settings on your display ad groups called “Targeting Expansion”.
This setting allows Google to also show your display ads to other users who are similar to your audience. However, how can Google create an audience similar to users who have added an item to cart and abandoned, or visited a specific product page? It can’t, turn this off, it will severely skew your results and guarantee you’ll be spending eternity adding negative placements to your campaign.
To turn this setting off, select your display ad group, and click on settings. Following this, select “Edit Ad Group Targeting”, once here, just slide the targeting expansion slider to the left, and click save.
- Is your business able to answer the phone 24 hours a day, 7 days a week?
Ours neither.
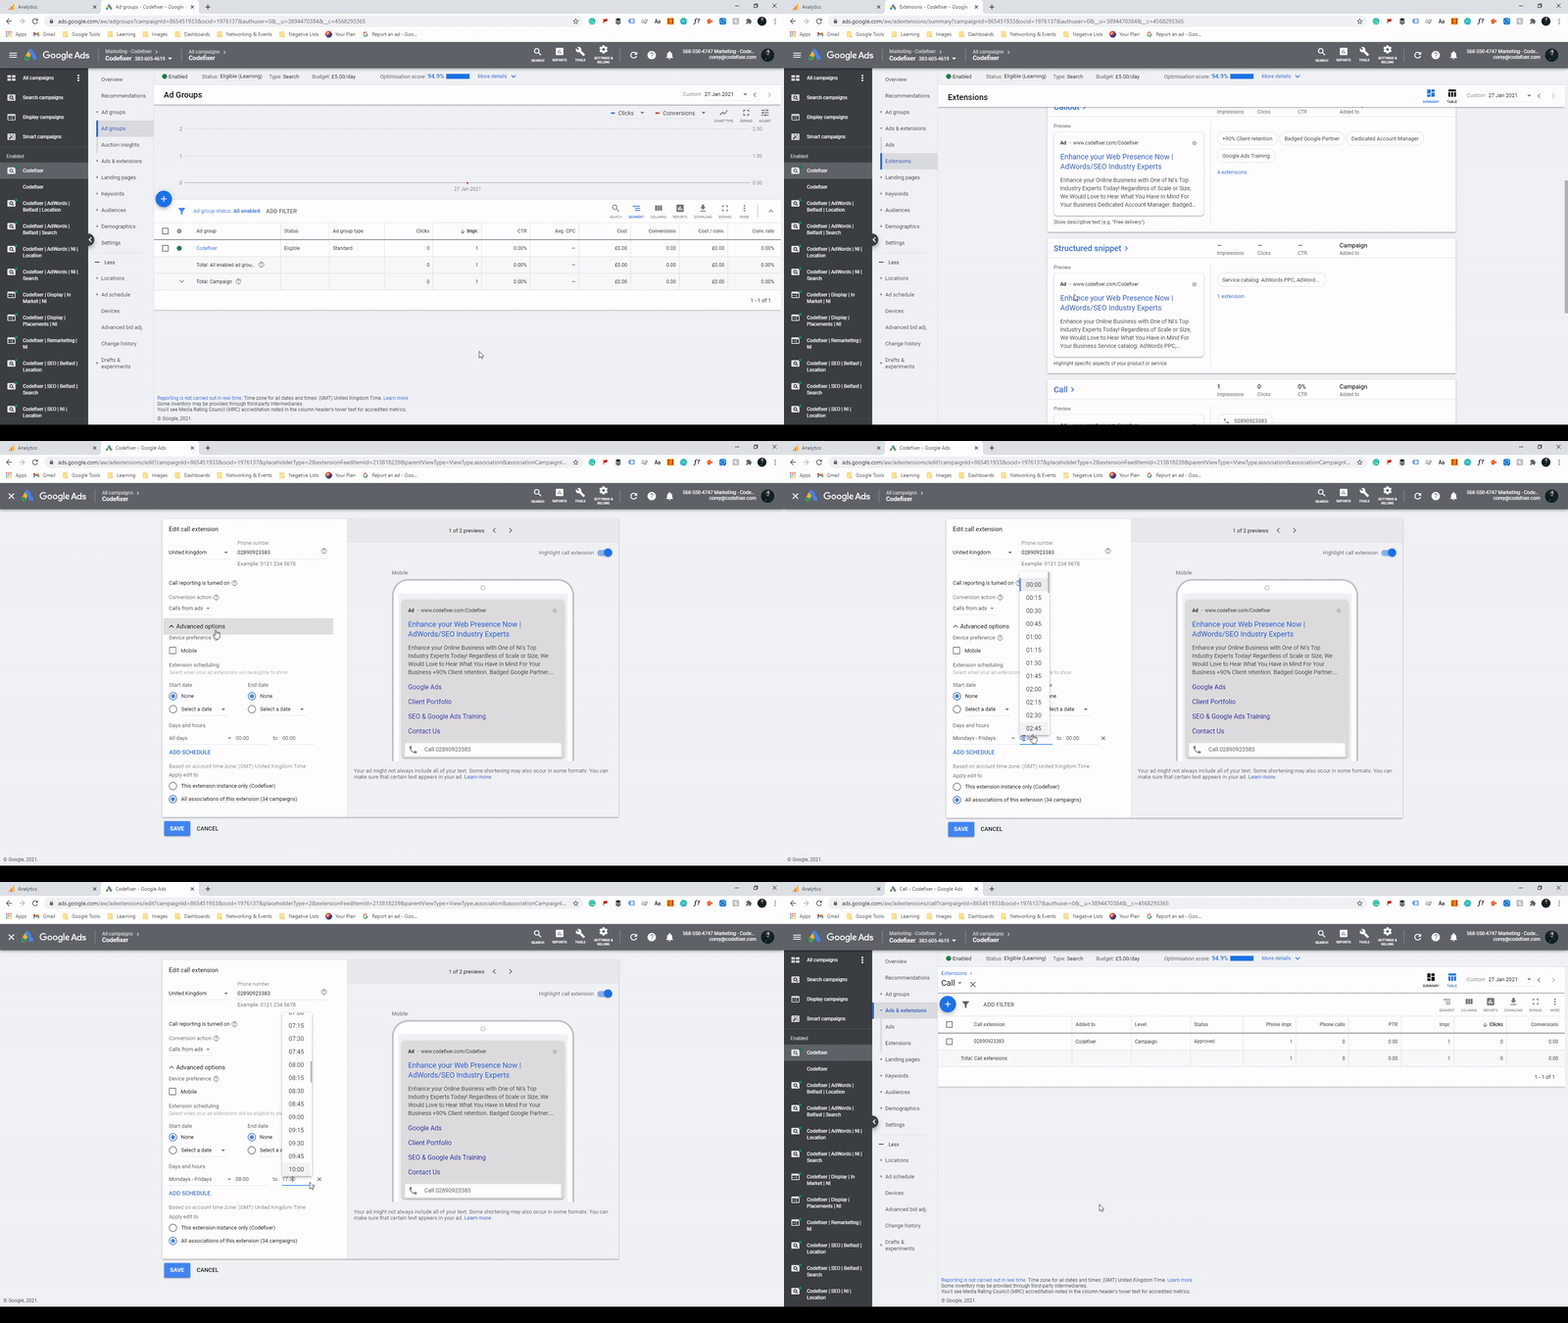
If you have set opening hours, and are missing calls from users calling out of hours, consider scheduling your Call Extensions to only appear during business opening hours.
85% of the users whose calls you miss won’t call back! Not scheduling your call extensions could be costing you money.
To add scheduling to your extensions, simply click the extension and select “Advanced Settings”, here we can add a custom schedule to our extension.
You may also wish to consider running a sitelink extension directing users towards your contact page when your call extension isn’t active, meaning you’ll have warm leads by the time you get to the office!
- Thinking of creating some new Google Ads campaigns?
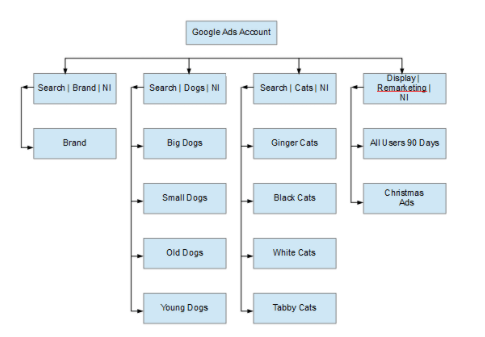
First, plan them out on paper rather than trying to build the campaign from memory.
Planning your campaigns correctly will ensure you haven’t missed any crucial components, and will allow you to visualise how the campaign will be structured without having to completely pull it apart and build it back together again!
This is one of the most important factors in planning and building a well structured Google Ads account.
- Can’t decide on which keyword match types to use on Google Ads?
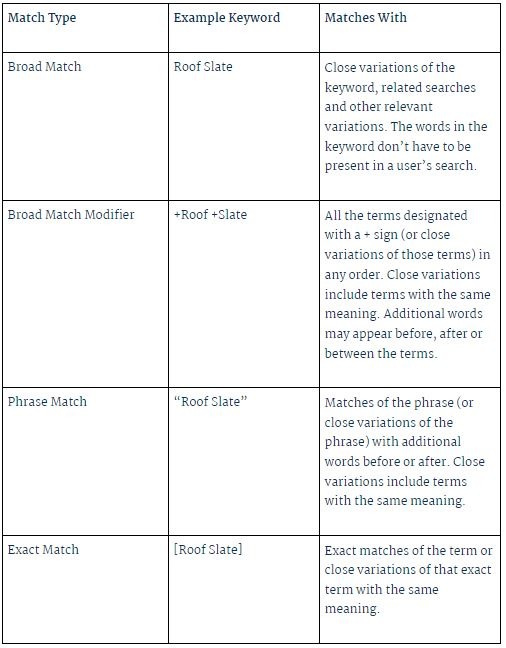
Most Google Ads users are familiar with Broad, “Phrase”, and [Exact Match] keywords.
But did you know that there is a 4th keyword match type?
+Broad +match +modifier keywords are designated, as such, with a + before each word. For a user to match with a broad match modifier keyword their search query must contain every word preceded by the + in your keyword (or a close variant).
This means broad match modifier keywords generally have less wastage than broad match and are more flexible than phrase match keywords as there can be varied orders in which the words appear in.
This is the Goldilocks principle, not too broad, not too specific, just right!
- Sick and tired of your display images appearing on nothing but spammy looking mobile apps?
Not to bother, 5 minutes of work and you’ll never appear on one again!
First, we need to download Google Ads Editor. Next, we must open the account, and select our offending campaign. Under “Keywords and Targeting” select “App Categories, Negative”. Simply right-click, click “New”, select “All Apps” click “Ok” and post your changes.
You’ll now never see a mobile app appear in your placements for this campaign again.
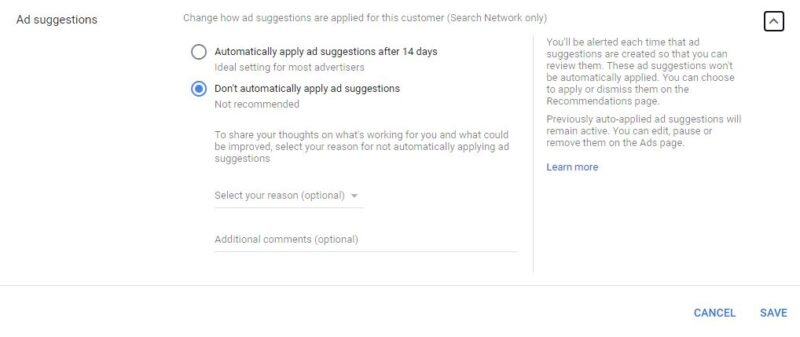
- Did you know that by default, you’ve probably allowed Google to make changes to your Google Ads account whenever they feel like it?
On your Google Ads account settings, there is an option for “Ad Suggestions”.
With the default setting, Google will automatically implement recommendations to your account after 14 days. This means Google can automatically make changes to your keywords, ad copy and landing pages.
To stop this from happening, visit your account settings, select “Ad Suggestions” and set the option to “Don’t automatically apply ad suggestions”.
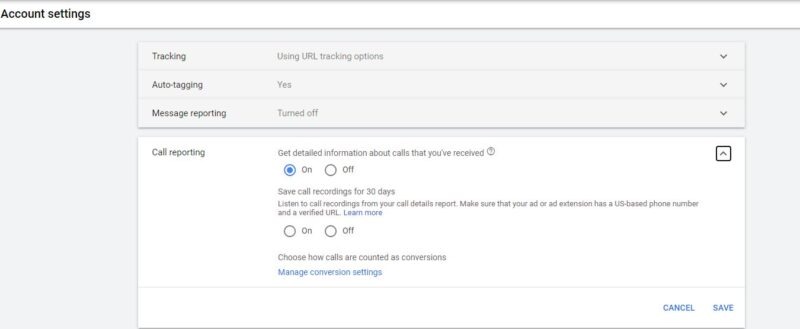
- Are you using call extensions on your ads?
If so, take 1 second to double-check that you have call tracking enabled in your account settings.
This allows us to view valuable information in the call details report from users who have called from our call extensions on our ads.
To view a detailed report of the users who have called, click on “Reports” at the top of your Google Ads dashboard, select “Predefined Reports”, then “Extensions”, and finally click on “Call Details”. Here we can see information such as the start time and duration of the calls, the date, the user’s telephone number, and the keyword that the user matched with when they clicked to call.
- Confused by the jargon and not sure which bidding strategy to use on your Google Ads account?
To put it simply, Google allows you to choose from one of two types of bidding, a manual bidding strategy, or an automated bidding strategy.
The benefits of using automated bidding is that Google uses historical data and machine learning to optimise the performance of your bidding strategy.
Manual bidding strategies, whilst not benefiting from historical data and machine learning, allow us to have much more control over how much we pay for our clicks. For this reason, we generally recommend users start off with the manual bidding strategy, manual CPC, and starting off bidding low.
When the account begins delivering results and has a higher volume of clicks and conversions we can then move over to an automated bidding strategy, such as Target ROAS, Maximise Conversions, Maximise Clicks, or Target CPA.
Which automated bidding strategy you decide on will depend on the objective of the campaign. If you are hoping to generate as many clicks as possible to get users into the top of your funnel and build your audience lists, then Max Clicks would be the better option. Want to generate as many leads as possible for your budget? If so, Max Conversions would be most appropriate. If you know how much each lead is worth to your business you can then try setting a target CPA bid strategy to get leads at a chosen cost. Websites with eCommerce tracking tend to benefit most from the Target ROAS bidding strategy, where Google will try to achieve a certain return on your Google Ads budget.
- Would you like to see through the eyes of the users you’re targeting on your Google Ads campaigns?
No problemo! Using only Google Chrome we can set our location to anywhere on earth, allowing us to emulate what users see on the search engine results page.
To change your location on Google Chrome, first, open Developer Tools by pressing f12, and press ESC to open the bottom drawer. Once here, click on the three dots on the left side and navigate to sensors. Once here, we can use Google’s preset list of locations, or add locations of our own. When creating your own locations, simply go to Google Maps and find the coordinates of the location you would like to emulate your location for, go back to Sensors, click manage, and add as many as you like! To then select these locations, simply select the location you would like to search from in the dropdown menu, and start searching on Google (Don’t forget to click “update location” at the bottom of Google and turn location tracking on!!)
- Tired of completing the same mundane tasks on Google Ads each and every day?
Fortunately for you, so is everyone else, and odds are, someone has already automated that task for you!
Google Ads allows users to use scripts to do anything on your account that a human can do (and more!). Best of all, little to no coding is required whatsoever.
Simply copy the script, click “Tools” on Google Ads, select “Scripts” under “Bulk Actions”, paste it in and hit save.
Two great scripts to get started with are the keyword conflict scanner, which identifies negative keywords blocking your ads from showing, and the link checker script, which will notify you if a URL is broken.
The sky is your limit with this one, there are thousands of scripts available out there for nearly every imaginable situation!
- Are you finding it difficult to determine which keywords to use on your Google Ads campaigns?
Fortunately, there are a few tools which can help you to get started.
Google Keyword planner in the Shared Library in Google Ads is a useful tool to begin prospecting for new keywords, we can start with a small selection of keywords, or a website URL and Google Ads will provide a suggested list of relevant keywords.
Ahrefs, a paid SEO tool, has a feature called Keyword Explorer. With this tool, we can again enter keywords, or a URL to receive a list of recommended keywords closely matching your seed keywords or URL.
Ubersuggest is similar to Keyword Explorer in Ahrefs and completely free for those without an Ahrefs account.
Answer The Public is a handy tool that provides you with contextual searches related to your keywords, however, a free account will only allow you a limited number of searches.
When used in combination with one another, these 4 tools will certainly get you well on your way with prospecting a list of keywords to target (Don’t forget to also pick out the rubbish ones to add to your negative keyword lists!).
- Have you royally mucked up something on your Google Ads account by mistake and worried about how you’re going to get yourself out of this mess?
Okay, so just remain calm for a minute.
There may be a very simple solution to this. Google Ads has a useful feature called Change History. In here, we can select a date range and look at the changes made on the account. What’s also very useful is that we can also undo these changes from here.
On your Google Ads overview, select “All Campaigns”, and navigate to “Change History” in the second column (you may need to click +More). Once here, find the offending change, and click undo. Just note, some changes can not be undone.
Never delete anything from your Google Ads account unless absolutely necessary, just pause. Once something is removed from a Google Ads account it’s almost impossible to get it back.
- Have you considered tracking call data from users visiting your website from Google Ads?
Now, what if we wanted to start collecting detailed data from users who click on an ad, and call the telephone number on our website?
For this, we’ll need to have Google Tag Manager installed on our website.
To set up advanced website call tracking, visit the conversions window on Google Ads and click to create a new conversion action. Next, click on phone calls, followed by “Calls to a phone number on your website”. Complete the details and select next. We can now see a tab saying “Use Tag Manager” which contains a conversion ID, and a Conversion Label.
Next, go to Google Tag Manager and create a new Tag. The first Tag we will create will be the Google Ads conversion linker Tag, select “Google Ads Conversion Linker” from the Tag Type list, and set it to trigger on all pages, this will allow Google Ads to collect the call data. Now create a second tag, this time for the advanced website call tracking. Select “Google Ads Calls From Website Conversion” from the dropdown, and enter the phone number you will be tracking as shown on the website, enter your conversion ID and Conversion Label and set the Tag to trigger on all pages. Once completed, save and publish your changes to your website.
Now when users visit your website from an ad, they will instead be given a Google Call Forwarding Number and the information from these calls will be available in the call details report on Google Ads.
- So your keywords are great, your Ads are stellar, but you’re not receiving as many conversions from your Google Ads campaign as you would expect. What gives?
9 times out of 10 it’s down to your landing pages.
Are you running an Ad for the keyword “Men’s Green Adidas Trainers”, but sending them to /footwear/? Or are you a business offering services, and sending users to your homepage, or a page chockablock with information?
Users searching online are looking for one thing. They are asking a question, and want an answer to that question. Users want to see the content of their search reflected on the content of the page. If they’re searching for “Men’s Green Adidas Trainers”, then send them to the page for men’s green Adidas trainers. If they’re searching a question, provide them with an answer.
Users rarely like being bombarded with endless text. Simply put, they only want to know 3 things. Who are you, what do you do, and how do they get in touch with you. Make sure your landing page is concise, straight to the point, and provides the information the user is looking for.
Try to limit links and navigation to other parts of your website, everything the user is looking for should be contained on that page, and the more someone has to go rifling through every page of your website to find what they’re looking for, the more likely they are to exit.
Landing pages should be simple and concise, not a history lesson on your business.
- Did you know that you can use Custom Rules on Google Ads to automate some aspects of Google Ads Management?
Custom rules can be created to pause, enable and adjust the bids on ad groups that meet conditions that you set. You can also set a rule to notify you by email when these criteria are met.
Custom Rules on Google Ads can include pretty much any metric on Google Ads. For example, you can create a custom rule to increase your bids by a set percentage when you fall below 80% absolute top of page rate.
To create a Custom Rule, visit the campaign or ad group overview, select the 3 “more” dots on the right-hand side, and simply click “Custom Rules”.
Why not start by creating a Custom Rule to pause an ad group when its spend exceeds £50 without a conversion?
- Are you taking advantage of free clicks from Google Shopping?
Implementing Google Surfaces on your Ecommerce website is an absolute must-have, especially if you’re currently using Google Ads to run Shopping Ads for your website.
If you already have a Google Merchant Center Account, simply click “Growth” and “Manage Programs” on your account. Select “Surfaces Across Google” and complete all of the fields.
You’ll start receiving free traffic in no time!
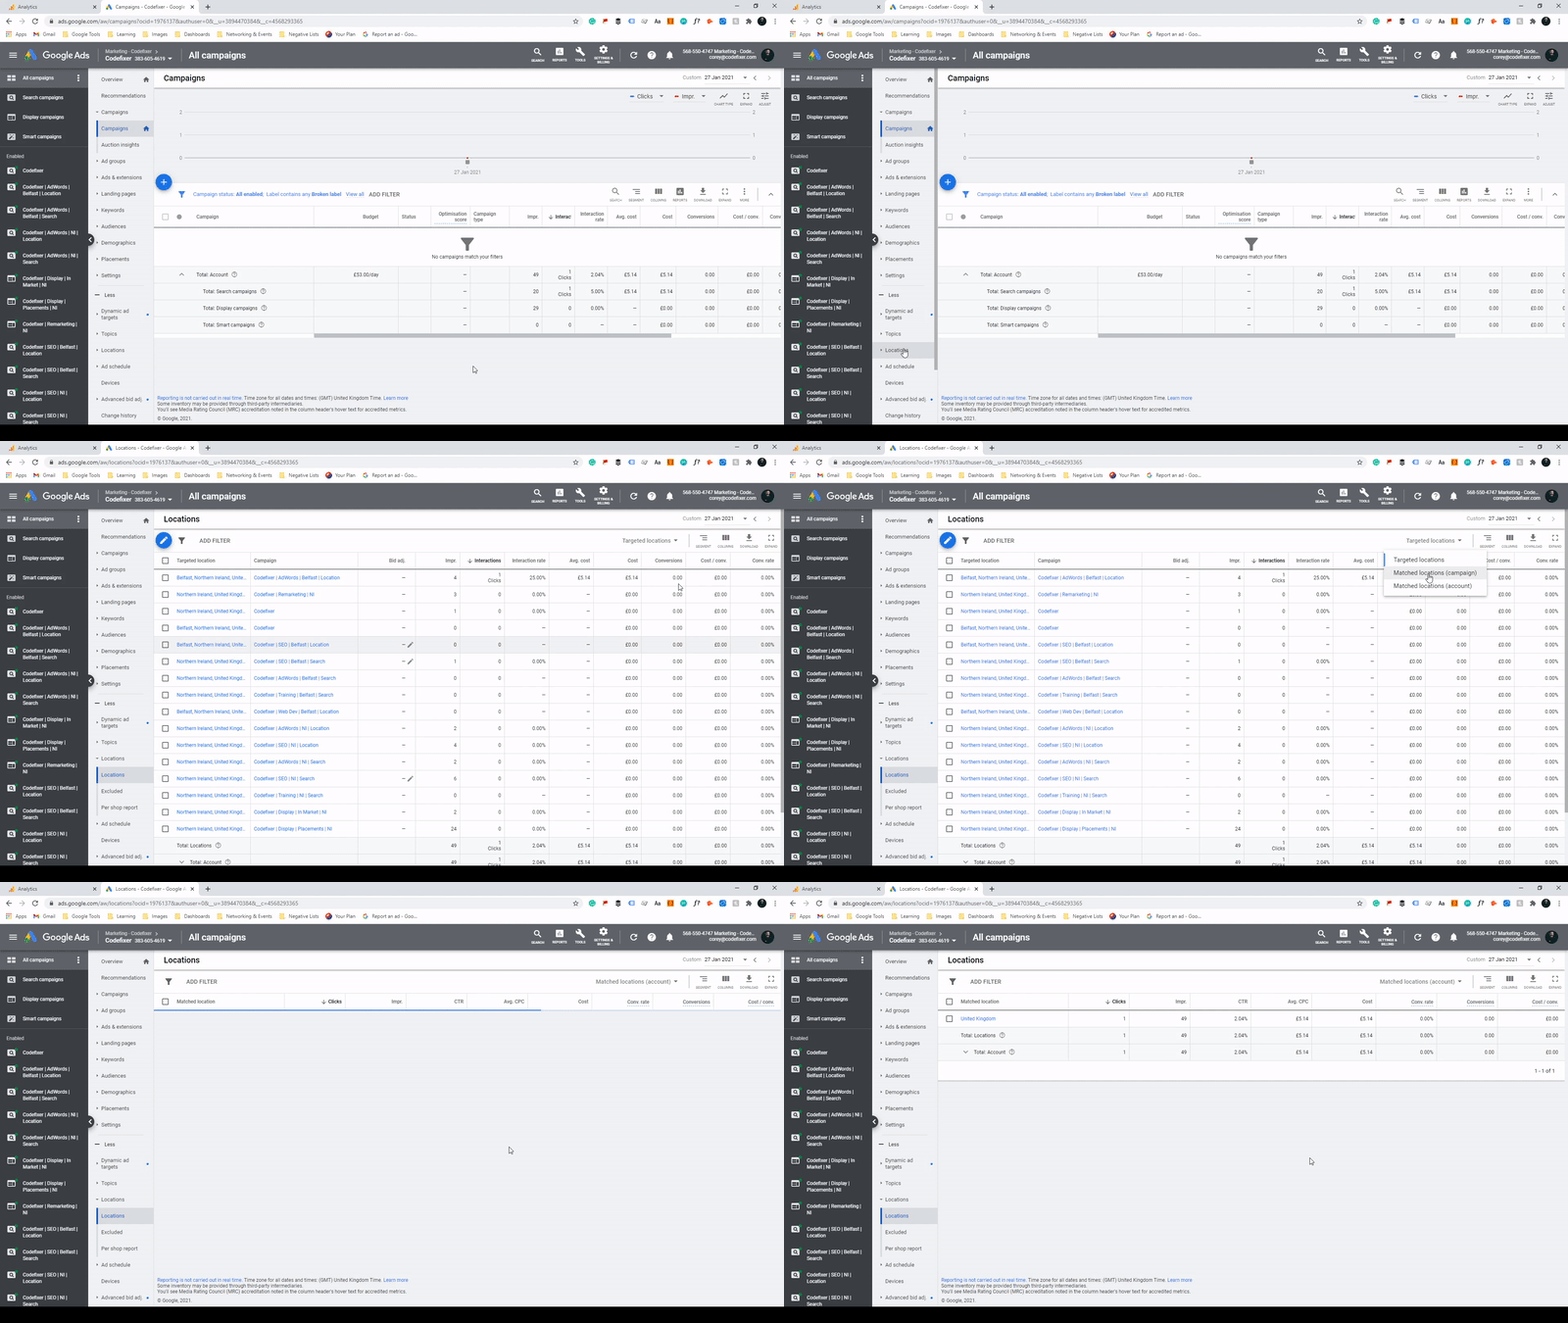
- Have you been wondering where the user location report has gone in Google Ads over the last few months?
Simply select “Locations” on the second sidebar, and change the dropdown from “Targeted Locations” to “Matched Locations (Account/Campaign)”.
Once here we can see how our account or campaign has performed at a country, province, county, city, or postcode level.
- Want to see who your biggest competitors are on Google Ads?
Viewing your auction insights report is the best way to determine who your biggest competitors are and how you’re faring against them in Google Ads.
We can look at our Auction Insights at a campaign, ad group, and even keyword level. This report allows us to see our impression share, overlap rate, top of page rate, absolute top of page rate (#1), and much more!
To find this, simply collect the campaign, ad group, or keyword you would like to see your statistics for and click “Auction Insights”.
We can then use the information gathered to better improve our bidding strategy and budget on our account.
- Looking for new keywords to add to your Google Ads campaigns?
Monitoring your search terms report is one of the most important daily maintenance tasks on Google Ads.
Not only does our search terms report help us understand how users search online and understand the intent behind specific search terms, but it also allows us an opportunity to add new keywords to our ad groups, and find new negative keywords to add our negative keyword lists.
To make this job less cumbersome on large accounts, you can filter your search terms to only show “Added/Excluded=None”. With this option selected we will no longer see search terms that already match keywords which have been added to the account.
Your search terms report can be found directly under the Keywords menu in the second column.
- Want to optimise your Google Ads account performance during the hours of the day that you’re most likely to convert a user?
We can use our time of day report to determine when users are most likely to convert from a Google Ads click.
To view this report select reports at the top of Google Ads, click predefined reports, time, then hour of day. Here we can see important information about our users depending on which hour of the day they’re visiting.
If your time of day report shows a ton of clicks before the office opens, and fewer in the mid-late afternoon, this means it is likely our ad budget is being used up outside of peak hours in the early morning. This would suggest that it may be a good idea to schedule your ads to not appear in the early hours of the morning. Likewise, if you find hours of the day where there are disproportionately higher conversion rates we can also use this to our advantage.
First, select a campaign on your Google Ads account, next click on Ad Schedule in the second column. We will now need to create a schedule for each hour of the day we will be showing our ads, i.e 09:00-10:00, 10:00-11:00, etc. Once you have completed this step, we can now see our schedules below. Next, click “Bid Adj”, and set a bid adjustment for the hours which showed the best performance in your time of day report.
Start by testing smaller increases, monitor, and adjust your bid adjustments over time.
- Are you using Google Ads for your business, but haven’t considered Bing Ads?
Bing has recently increased its market share to 9.95% of the search industry in the UK.
Whilst this figure is quite far off from Google’s 87.96% share of UK searches, it’s still nothing to scoff at considering there are an estimated 15 billion searches on Google every month from users in the UK.
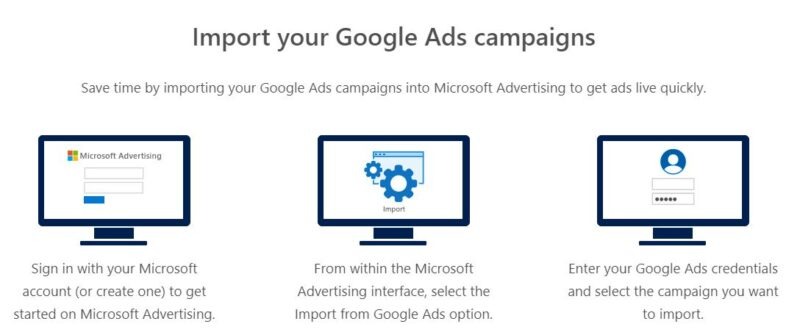
Have I also mentioned how incredibly easy it is to create a Bing Ads account using your existing Google Ads account?
Simply create a Bing Ads account, select “Import” in the top navigation bar, and click “Import from Google Ads”, next, pop in your billing details and you’re ready to go!
Just make sure you’ve done a little bit of research as to how to get Bing Ads conversion tracking implemented as it’s not quite the same as the method you will have used for Google Ads.
- Is your Google Ads campaign showing as limited by budget, but you’d like more conversions?
One simple way of increasing the number of conversions you’re receiving from your budget is by reducing the budget being wasted on under-performing keywords.
To increase the number of conversions you’re receiving from your existing budget, look at your keyword performance over the last few months. Now, click on “Columns” and add new columns for Conversions, Cost/Conv., and Conv. Rate. Using the campaign averages at the top or bottom of our table, we can easily identify underperforming keywords. If your campaign average conversion rate is 5%, pause any keyword which has a conversion rate significantly lower than 5%.
Once we pause these keywords we will be allowing our budget to be utilised for our better-converting keywords. Using our search terms report we can then identify new keywords to add to our ad groups to continue to improve this over time.
During your investigation, you may also find that there are specific ad groups with poor performance. You may want to consider also pausing these, once again, funnelling our budget towards our most profitable ad groups.
- Have you noticed strange extensions occasionally appearing on your ads?
I first noticed this with an ad we were running at Codefixer that had a sitelink under it for “Hello World”. A little bit embarrassing, right?
What was more embarrassing was that when I first originally noticed this, I wasn’t sure how it was happening!
Everybody, by now, should know that using a variety of extensions on Google Ads is absolutely crucial. What some may not realize is that Google will sometimes decide to display automated extensions unless this is explicitly disabled.
Google can show automated sitelink, structured snippets, call, callouts, seller ratings, and location extensions.
It’s best practice to include all applicable extensions when we create new campaigns or ad groups on Google Ads, so we shouldn’t really need automated extensions at all if that step wasn’t skipped!
This setting is probably one of the best-hidden settings in Google Ads.
To disable automated extensions, select “Ads & Extensions” on your second side-bar, and click on “Extensions”. Now make sure that your extensions are being shown in “Table View”, rather than “Summary View”. Next, select “Automated Extensions” from the drop-down menu at the top left. Now we must click on the 3 vertical dots where it says “More” on the right-hand side, and select “Advanced Options”. Now we can choose which specific Automated Extensions to disable.
I’d recommend turning all of these off and manually creating them, or failing that, at least the call and sitelinks extensions!
- Visit the Codefixer Blog & Signup to the Newsletter
We release new Google Ads & SEO content every month. We only send 1 newsletter each month to make sure you’re only seeing the best and most up-to-date content available!


