Recently we reached an important milestone for one of our clients, achieving £1,000,000 in revenue through their Google Shopping campaign.
This presented us with a fantastic opportunity to share exactly how we achieved this accomplishment, breaking down the exact steps required to create & run a successful, profitable Google Shopping campaign from £0 to £1,000,000 in revenue!
This campaign had been run twice before, by 2 other agencies. When we took it over there were footprints of an old campaign that didn’t perform well. In the beginning, the biggest difference in the previous campaign and the new campaign was that the cost per click was significantly reduced. This allowed us to get the maximum number of clicks per budget. Originally there was a budget of £20 per day. The number of clicks was limited due to the average cost per click coming in at over £1. When the CPCs were reduced the number of clicks went up and the sales went up accordingly.
How to Make Money on Google Shopping
Understanding the Objective
Understanding the objective of your Google Shopping campaign is the most important factor in creating your campaign. If you do not have set performance indicators in place it will be difficult to measure the success of your campaign. Ultimately the objective is to be profitable, and there are a few things we must consider to ensure the campaign is profitable.
It is important to understand the cost per acquisition that is necessary for each product to remain profitable. If you’re running a Google Shopping campaign on behalf of your own business you should already know these figures, however, if you are working on behalf of a client you must have an understanding of the overheads and margins of all products that will be used on the Google Shopping campaign.
Knowing which products are of a high, medium, and low profitability will help you prioritise products that result in more money in the bank. Ask your client how much in advertising spend they are willing to spend per product to get a sale. You may find that for some products the client can pay £50 per unit sold and remain profitable, whilst on other products this may be considerably lower.
Categorise products by profitability – group the products together by high, medium and low profitability, keep this aside for your shopping feed. Any products that are of low profitability will be excluded from the shopping campaign.
Now that you understand the objective of your campaign it’s time to create it.
Preliminary Requirements
The first thing we will need to create our Google Shopping campaign is a Google Ads account. Simply visit Google Ads and create an account. There are tons of resources online to help you with this if you need it. Your eCommerce conversion action from Google Analytics should be imported to the Google Ads account.
We will also need a Merchant Center account. To create this, go to Google Merchant Center and create an account using the same email address as the one which was used for the Google Ads account.
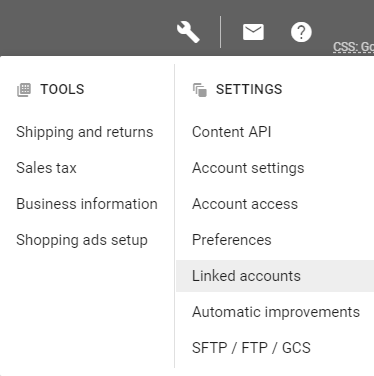
Once you have created your Google Ads & Google Merchant Center accounts, on Google Merchant Center click the “Settings” button at the top (the wrench), and select “Linked Accounts”, as shown in the image below. After this, click on the “Link” button next to the correct Google Ads Customer ID. Once you’ve finished this step, go back to Google Ads, click “Tools”, select “Linked Accounts” and approve the request. Your Google Merchant Center & Google Ads accounts should now be linked.
Once you’ve linked Google Merchant Center & Google Ads you must complete your Shipping & Returns, Sales Tax & Business Information sections on your Merchant Center account. Do this before proceeding to the next step.
Creating Your Shopping Feed
It’s now possible to create Google Shopping campaigns without a feed, however, if you are going to be promoting multiple products it’s best practice to create a dedicated feed.
Depending on the eCommerce platform your website is using, you may have a plugin or setting that will allow you to generate a feed from the attributes you have already set for your products. If you wish to use this method please refer to the Google Shopping Feed documentation for the specific eCommerce platform you’re using. The following steps will show you how to create a shopping feed in Google Sheets.
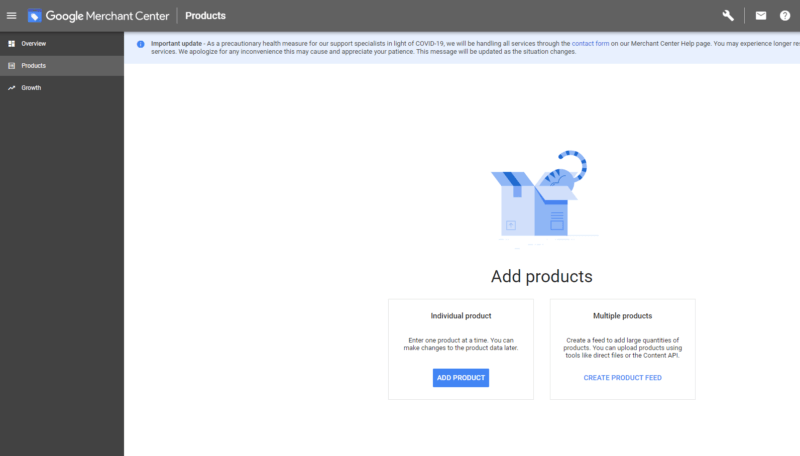
On Google Merchant Center select “Products” on the left sidebar, and select “Create Product Feed” under “Add Products”.
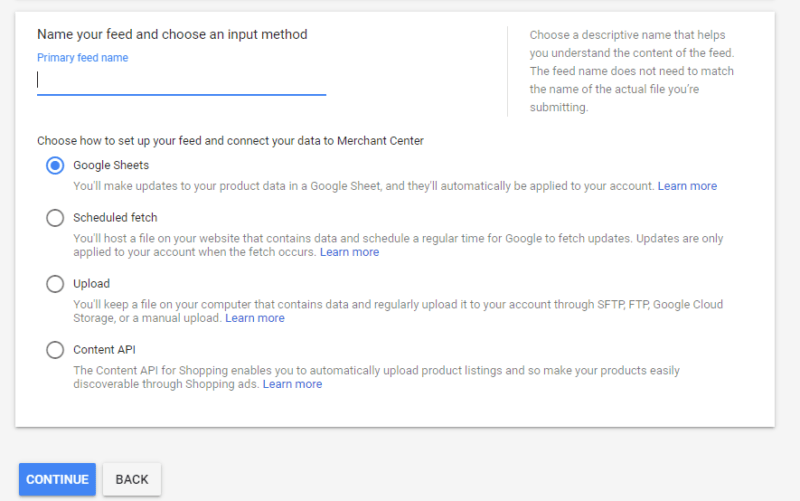
Once you’ve clicked “Create Product Feed” you will be directed to the following page. Once here, enter a descriptive feed name which will be distinguishable from other feeds you may have or may create in the future. Ensure the option for “Google Sheets” is selected and click the blue “Continue” button.
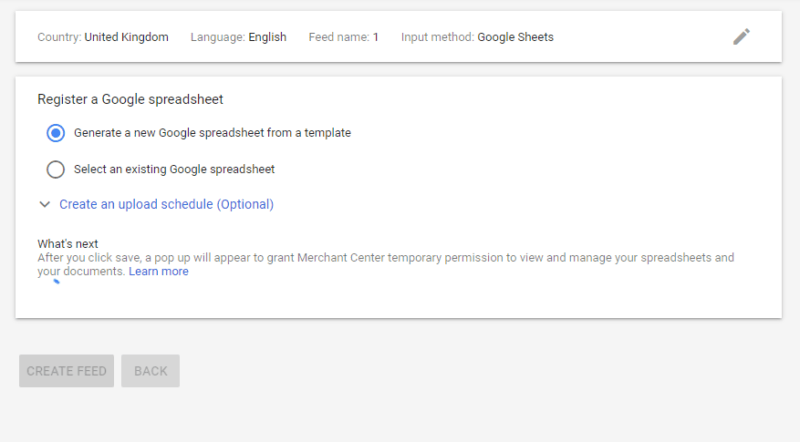
Once you click “Continue” you will be directed to create a new Google Spreadsheet from a template and select “Create Feed”. A pop up will appear asking you to grant Merchant Center temporary permission to view and manage your spreadsheet. Follow the instructions on the pop-up.
Once you’ve finished the previous step you should now see your new shopping feed with fields to complete for each product.

Your shopping feed has some required, and optional fields. Required fields must be completed for your shopping campaign to start showing. The optional fields allow you to provide extra information about your products. Some options may be required depending on the type of product (such as clothes and refurbished products) or depending on the country in which the business resides, for example, in the United States, it’s necessary to have a field for tax.
The required fields on the shopping feed are;
- ID – a unique identifier for each product
- Title – the name of the product you’re selling
- Description – a description for your product, this can be up to 5,000 characters long, however, any more than 500 characters and users will have to click to expand, keep your most important information at the beginning
- Link – the URL of your product page on your website
- Image_link – a link to the product image, can be up to 16mb and must be larger than 100px x 100px. The image must not contain promotional text
- Availability – either in stock, out of stock, or preorder
- Price – the price of the product, this must match what the final price the user will pay
- Brand – the brand of the product
- GTIN – Global Trade Item Number is a unique identifier for each product, usually found on the barcode or available from the manufacturer
- MPN – Manufacturer Parts Number, if there is no GTIN
- Shipping – This is used to override the delivery settings that you set up in Merchant Center
- Tax – Required in the USA
- Custom_label 0 – This will be used to denote which products are of high, medium, or low profitability
- Google_product_category – This is not required, however, it’s a good idea to include this, here’s a list of all the available Google product categories
All other Google Product specifications are listed here.
Complete each applicable field. Take your time to ensure that each section is completed accurately and to the best of your ability. Do not rush this step, it’s certainly worth taking your time. Pay close attention to the products that you expect to sell the best and which have the most search volume. In our case, 10 out of the total of 155 products generated 60.98% of revenue on the Google Shopping campaign.
Shopping Campaign Structure
Campaign structure is an often overlooked important factor in how your campaign performs, and how much you’re paying for your clicks. Segmenting products into separate campaigns and groups allows granular control for bidding and showing our products to the correct users.
In the image below there are 4 campaigns created. There is one campaign which has generated nearly 95% of revenue on the account, however, the other campaigns play an important role in filtering searches to each campaign depending on intent and geography.
The top campaign, “Shopping | Brand | GB” targets brand searches in Great Britain and excludes Northern Ireland. The campaign priority is set to medium. This campaign has 4 ad groups, one for each brand of product that is being sold on the Google Shopping campaign.
We pair these campaigns by using the “priority” settings, as well as negative keywords. This allows us to funnel clicks towards the relevant campaign.
The first campaign is paired to the second campaign, “Shopping | Non-Brand | GB”, which is targeting users who searching the same products but using a non-brand search. The names of each of the 4 brands are added as a negative keyword in this campaign and the campaign priority is set to high. What this does is ensures that users who search for these products using the search term “Brand X Product Y” will arrive on the top campaign. The bids are set higher on this campaign due to the intent by the user searching for the full name of the product.
Users who are searching descriptive terms rather than brand & product terms arrive in the second campaign where the bids are less than the top one. For example, if a user searched for “Men’s Durable Jacket” they would arrive in the second campaign, whereas if a user searched “Men’s Barbour Wax Coat” they would arrive in the first campaign. As such, we would pay more for this click as the user has asked for a specific product and the purchase intent is more.
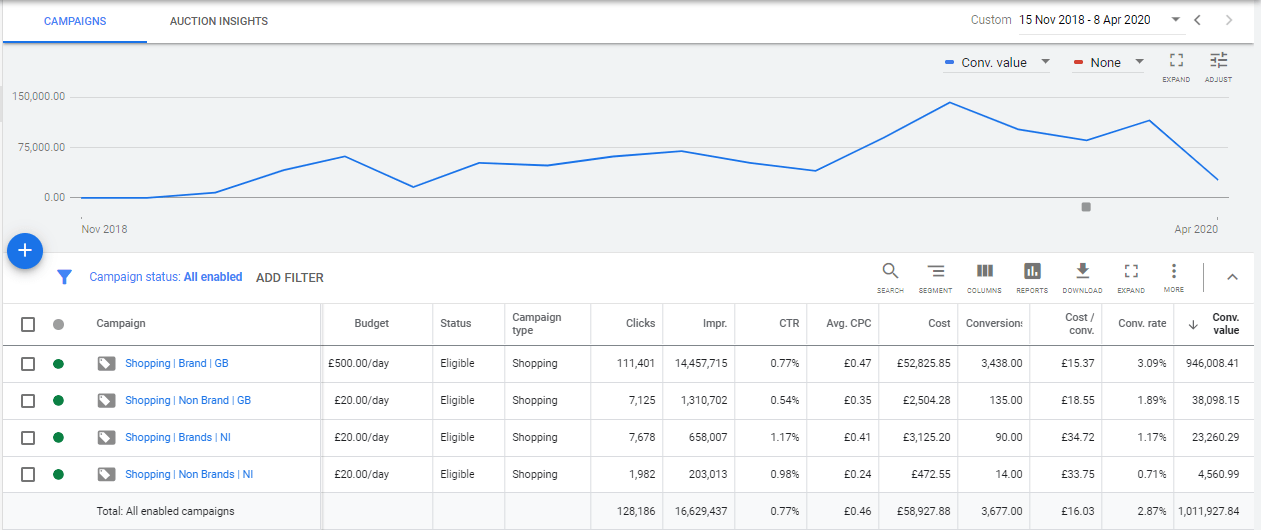
The bottom two campaigns on the image target Northern Ireland only. These campaigns sell larger, more expensive products which have to be locally delivered from our client in Northern Ireland. It would not be profitable to have them shipped over to Great Britain at the advertised cost, as such, these products are not in the GB shopping campaigns.
Setting Up Your Shopping Campaign
To create your Google Shopping campaigns, on Google Ads, select campaigns and click the plus sign, as with any campaign. Select “Sales” as the Goal and “Shopping” as the campaign type. Under this, select the connected Google Merchant Center account with the feed on it, and choose “Standard Shopping Campaign” as the campaign sub-type. Click to proceed to the following setup steps.
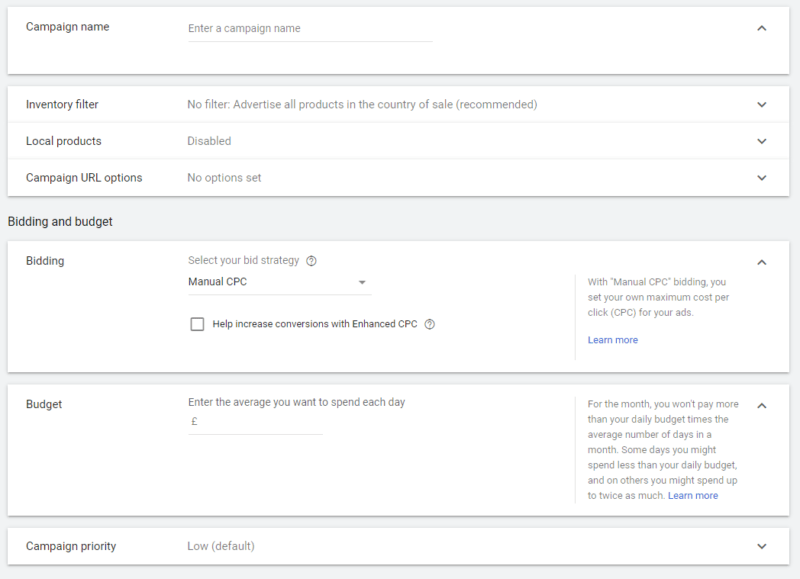
On the next page, you’ll be required to complete your campaign settings. To create campaigns like the “Shopping |Brand | GB” and “Shopping | Non-Brand | GB” complete the settings as follows;
- Add a descriptive name, you could even copy the examples above
- Set your bidding to manual CPC (this will make sense later)
- Set a daily budget for the campaign
- Set the campaign priority to “Medium” on the “Brand” campaign, and “High” on the “Non-Brand” campaign
- Under targeting, click to expand networks, deselect the options for “Search Network” and “YouTube, Gmail and Discover”
- Add your target locations, in the location options choose “People in or regularly in your target locations” and “People in your excluded locations”
- Repeat this step until you have a brand and non-brand campaign
- In the non-brand campaign add negative keywords for each of the brands of products you will be selling in the campaign as phrase match
Ad Groups & Product Groups
Once you have completed creating your campaigns, in each campaign, create 1 Product Shopping ad group for each brand of products you will be selling with the brand as the name.
On the “Brand” campaign the bids should be about 30% higher than in the “Non-Brand” campaign. For example, have the bids in the “Brands” campaign at 50p, and the bids on the “Non-Brand” campaign at 37p.
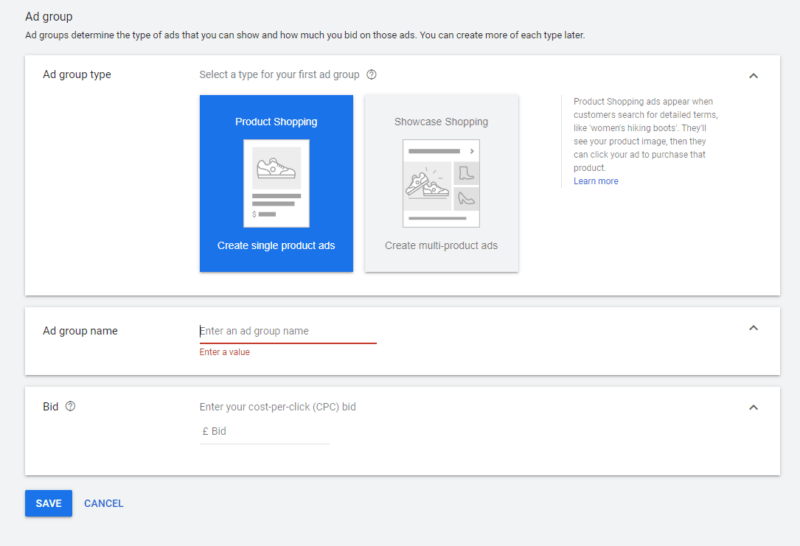
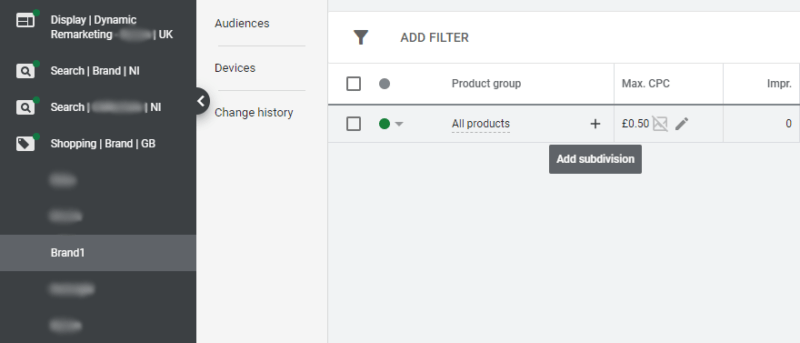
Once you’ve completed the fields above and clicked “Save”, you should arrive on the screen, as shown, below. We can see that in the “Shopping | Brand | GB” campaign we now have an ad group called “Brand1”. Click on the ad group to view the product groups. Click on the + sign to create a subdivision.
On the dropdown menu, it should say “Product Type”. Change to subdivide all products by brand, and select the brand for each relevant ad group. Click “Continue to edit bids” and complete the steps.
What you should now see is as shown below. There will be 2 groups of products, “Brand1”, and “Everything else in all products”. Click on the green dot next to “All Products” and select exclude. This means that this ad group will only deliver for products that are listed under this brand.
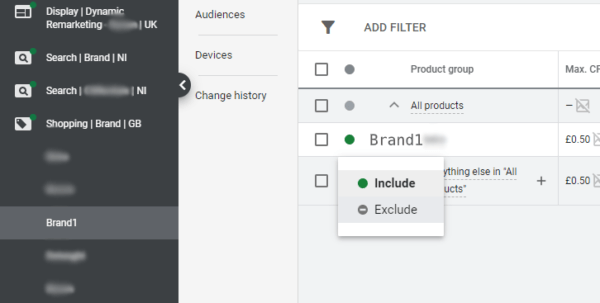
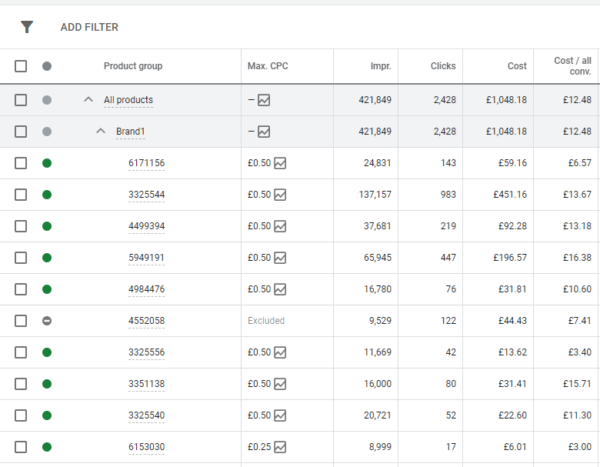
If you added fields to your shopping feed for high, medium & low profitability, we will need to segment your product group for “Brand1” one more time. Once again, click the + to segment, and now in the dropdown at the top select “Custom Label 0”. Check the boxes for High, Medium, and Low on the left-hand side and proceed. Now exclude the product group for “Low” following the same steps as in the image above. The reason we segment the low profitability products is that these are going to make it considerably more difficult to achieve a positive return on investment.
When we review bidding we will adjust the bids independently for the low and high profitability products. The reason for this is we will be able to bid slightly higher on the more profitable products and remain profitable, whereas the medium profitability products will need a little bit more caution on bidding.
Repeat the above steps in both campaigns, for each ad group. Once we’ve done this, within a short length of time your shopping campaign will be approved and your ads will begin delivering.
Daily Tasks
Now that your Google Shopping campaign is running the hard work can begin.
Look over the performance of each product on the shopping campaign regularly. Are there any products that are receiving lots of clicks, spending lots of money and not leading to any conversions? Consider excluding these products. If your products aren’t showing try increasing your bids.
Each day it is necessary to find out how competitively our products are priced and who our competitors are on the Google Shopping campaign, this will allow us to adjust our bids.
For this, I created a Google Sheets document with several fields. The product name, Product ID, GTIN, price, best competitor price, the name of the best-priced competitor, number of better-priced competitors, and the position our product showed up when sorted by price ascending on the shopping tab of Google.
Each morning I record the results for the top 20 selling products and monitor any changes in position. If we are best priced, or equal to the best price on the product on the “Brand” campaign I will change the product bid to 50p, and if we are being outpriced I will change the bid to 25p. On the “Non-Brand” campaign this is 37p and 17p respectively.
What we do is simply open an incognito Google Chrome window and search for the products either by name or GTIN and enter the results on the Google Sheet with one new tab created for each day. These results are then sent off to the client, the client can then advise me of any changes to prices or availability of certain products. Often we can price match our competition as a result of the price check, ensuring we’re the best price on Google Shopping.
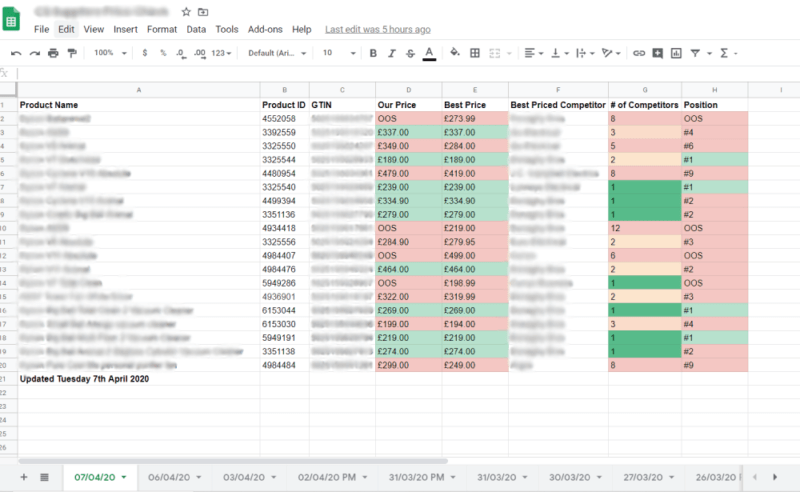
To make the data easier to read at a glance there is also conditional formatting on the price fields. This conditional formatting changes the “Our Price” & “Best Price” fields to green if our price is equal to the best price. If the best price is less than our price the fields will change to red. The formula from this is as shown below. There is also similar conditional formatting for the number of competitors and position columns.
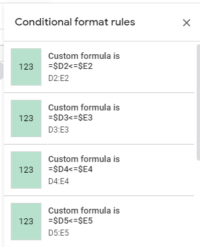
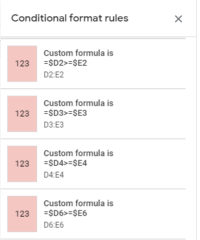
As a result of the price check and communication with the client, it is important to update our campaigns accordingly. Any of the products with price fields in green get the higher rate bid (50p on the brand campaign), if they’re red, the bids will be changed to the lower rate (25p on the brand campaign).
If there are products that are no longer in-stock exclude these products from your product groups, and change the “Availability” field in the shopping feed to “out of stock”.
Conclusion
After setting your Google Shopping Campaign up correctly, the next most important step is diligently managing it. Understanding, not only your products but your client, competition & the market. You will begin to understand competitors and will know who will be lowering their prices in response, who’s bidding high on their products, and who is the dodgy reseller. You will begin to understand market behaviour and predict peaks and troughs in product performance in advance.
Much of running a successful Google Shopping campaign comes down to communication. If I didn’t send my client his morning price check, or he didn’t respond, we would be in a completely different situation currently, and certainly wouldn’t be celebrating this milestone. The single most important thing I did was create the Google Sheet and monitor competitor prices regularly. This helped me understand which products were going to be successful, and which that we’re worth fighting over.
Codefixer is a Google Ads Partner Agency in Belfast. If you need help with Google Ads Management, or Google Ads Training don’t hesitate to Contact Us about your project!
FAQ’s
Whilst smart bidding and automated bidding strategies certainly have their place, they can be incredibly unpredictable, especially in the beginning. It is recommended for an automated bidding strategy that there is plenty of data on the campaign. A new Google Shopping campaign will have no performance data, therefore, when using a Target CPA, Max Conversions, Target CPA, etc, bidding strategy Google may bid extremely high and exhaust your budget early in the day with no results.
As such, I would always recommend starting on a manual bidding strategy and moving this over to an automated bidding strategy (if you wish) once you are receiving more than 50 conversions per month and there is at least 60 days of performance data on the campaign. N.B, when you change bidding strategy to automated from manual, Google will enter a “learning period” where results will again be unpredictable during this phase. The more conversion data your account has, the quicker the learning period will be completed.
Volume and profitability go hand-in-hand on Google Shopping in some respects. The answer to this question is purely mathematical and will be different for everyone.
Selling 10 products with £10 profit per unit at £5 CPA is still going to be as profitable as selling 1 product with a £50 profit margin at £25 CPA. Ideally, we would like to be somewhere in the middle, where we can sell 10 of the product with £10 in profit AND 1 of the product with £50 in profit. It’s important to have a mix of products that are profitable, less valuable, and higher volume, as well as some products which may not receive as much volume, but will be more profitable per unit sold. We also use this mix in our Google Shopping. We have some products that sell for upwards of £1,500, however, these sales are much less dependable than the lower-priced products. Whilst we can depend on selling a few thousand pounds worth of items sold at £200 – £500, the more expensive products are less regular, predictable, and dependable.
Seasonality certainly has an impact on consumer behaviour on Google Shopping.
During events such as the run-up to Christmas, Black Friday, January Sales, etc it is more important to have up-to-date information on pricing. During these events, some competitors might change their pricing multiple times over the day. It’s imperative that during seasonal events that the prices are checked more often. My strategy for this is to do an AM and PM price check and adjust bids at the beginning and end of the day. Ensure your communication with your client is as clear as ever and ensure product pricing is adjusted regularly in response to what competitors are doing.
On our Google Shopping campaigns, we try to target 60% overall impression share and 30% click share on our high priority/high profitability products.
Depending on the competitiveness of the market and pricing this will change. We sell products between £200-£500 which generally have between 10-20 other businesses selling the same products. We are able to achieve 60% impression share and 30% click share by managing our bids diligently and ensuring we have excluded any products which we are not priced competitively for or are out of stock.
Trust and pricing are the two very important factors in running a successful Google Shopping campaign, as such, continually checking your price competitiveness on a regular basis & adjusting prices and bids where applicable will help you have success on your account. Look for products which have a high volume of searches and which are profitable, from there, deduce which have a low number of well-priced competitors and look for opportunities. Lowering the price of your products could significantly decrease your cost per acquisition, therefore actually improving the profitability despite charging less.
Another way to improve how consumers perceive your business online is by using seller ratings. Seller ratings is a free programme, provided by Google, that collects post-purchase reviews on behalf of merchants and displays the aggregated reviews to users on Google Shopping from 1 star, to 5 stars. Reviews online can greatly improve the trust a consumer will have in your business and increase the odds that they will choose to do business with you, rather than a slightly higher priced, but better-known retailer.
On Google Shopping, trustworthy products from recognisable brands always do better than lesser-known alternatives. It is advisable to use Google Keyword Planner and to check “Best Sellers” on Merchant center to get an understanding of potential volume.
Selling products from brands that consumers are already familiar with is especially important when selling high-value products.
There are a number of free & paid price checking packages available online. Which price checker is most suitable for you will depend on your budget, the products you’re selling, the location you’re based, and who your competitors are. There are plenty of resources online for researching the most suitable for your business.
Google Merchant Center also allows us to check how competitive our prices are. On Google Merchant Center, select the dropdown for “Growth” in the left sidebar and navigate to “Price Competitiveness”. This will give us an understanding of which products are Above, At or Below the benchmark price.
I strongly suggest manually checking the most popular products. The Pareto Principle suggests that 20% of your products will result in 80% of your sales. As such, carefully monitor your most popular products, and potentially use automatic price checking software for the remainder. It is imperative that YOU have a solid understanding of your product performance, don’t be a victim of convenience. Automated price checkers certainly have an important role to play, but data is only as strong as the ability of the marketer to interpret it.
If you have a large number of products on your Google Shopping campaign, either as a large number of individual brands, or a large number of products by one individual brand, it’s more important to segment your products. The best way to do this is by segmenting brands using custom labels. Create labels for High and Medium profitability products, this will allow you to easily identify the products you need to bid higher on.
If you supply a large number of products from a small number of brands, for example, you sell Dulux Paint, but there are hundreds or thousands of products in this range, you can further segment them. In this instance you could add a new field to your Shopping Feed for “custom_label 1”, and in this field further segment your products, by, for example, colour. You would then have 1 ad group for “Dulux”, 2 product groups for “Low” and “High” profitability, and the 2 product groups will again be segmented by “Red, White, Grey, Black” etc.

